WIZ Ethernet Library for Arduino IDE-1.6.4

ARM mbed
Download Arduino IDE-1.6.4

WIZ Ethernet Library

The Ethernet library lets you connect to the Internet or a local network.

  • Supported devices
    W5500 : ioShield, WIZ550io, W5500 Ethernet Shield, Arduino Ethernet Shield 2
    W5200 : W5200 Ethernet Shield, WIZ820io
    W5100 : Arduino Ethernet Shield

  • Software

  • Install WIZ Ethernet library IDE-1.6.4
  • Download all files
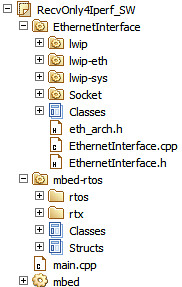
  • Overwrite “Ethernet” folder onto the “Arduino\libraries\Ethernet” folder in Arduino sketch.

  • Select device(shield)

  • Uncomment device(shiel) you want to use in $/Ethernet/src/utility/w5100.h
//#define W5100_ETHERNET_SHIELD // Arduino Ethenret Shield and Compatibles ...
//#define W5200_ETHERNET_SHIELD // WIZ820io, W5200 Ethernet Shield
#define W5500_ETHERNET_SHIELD // WIZ550io, ioShield series of WIZnet
  • If WIZ550io used, uncommnet “#define WIZ550io_WITH_MACAADDRESS” in $/Ethernet/src/utility/w5100.h
#if defined(W5500_ETHERNET_SHIELD)
//#define WIZ550io_WITH_MACADDRESS // Use assigned MAC address of WIZ550io
#include "w5500.h"
#endif
  • Using the WIZ Ethernet library and evaluate existing Ethernet example.
    All other steps are the same as the steps from the Arduino Ethernet Shield. You can use examples in ./Ethernet/examples folder for the Arduino IDE 1.6.4, go to Files->Examples->Ethernet, open any example, then copy it to your sketch file and change configuration values properly.
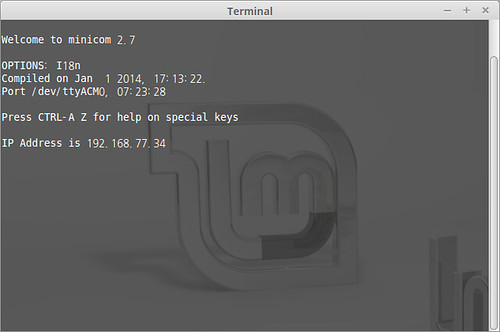
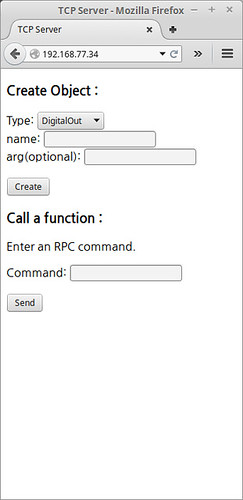
    After that, you can check if it is work well. For example, if you choose ‘WebServer’, you should change IP Address first and compile and download it. Then you can access web server page through your web browser of your PC or something.

What is new ?

  • Added new functions
  • sockStatus(SOCKET s) = readSnSR(SOCKET s)
uint8_t socketStatus(SOCKET s)
{
SPI.beginTransaction(SPI_ETHERNET_SETTINGS);
uint8_t status = W5100.readSnSR(s);
SPI.endTransaction();
return status;
}
  • reavAvalable(SOCKET s) = getRxReceiveSize(SOCKET s)
int16_t recvAvailable(SOCKET s)
{
SPI.beginTransaction(SPI_ETHERNET_SETTINGS);
int16_t ret = W5100.getRXReceivedSize(s);
SPI.endTransaction();
return ret;
}
  • Added SPI Transaction APIs
    To solve conflicts that sometimes occur between multiple SPI devices when using SPI from interrupts and/or different SPI settings, SPI Transcation APIs use between between read and write SPI functions.
SPI.beginTransaction(SPI_ETHERNET_SETTINGS);
W5100.setIPAddress(_dhcp->getLocalIp().raw_address());
W5100.setGatewayIp(_dhcp->getGatewayIp().raw_address());
W5100.setSubnetMask(_dhcp->getSubnetMask().raw_address());
SPI.endTransaction();
  • Removed Twitter.cpp / Twitter.h

Code on Github

Version History

  • Initial Release : 21 May. 2015

Network Handbook in ARM mbed

Handbook in ARM mbed includes settup tutorials for mbed platform such as Ethernet as well as mbed library.

Networking Handbook

For networking based on Ethernet network, Ethenret Interface library is provided and is composed TCP/IP Protocol layer, Ethernet, EthernetInterface and Socket. In other words, the EthernetInterface library includes the networking stack necessary for connect betwwen mbed platform and Internet.

Each layer in EthernetInterface provides APIs to connect to the internet.

  • mbed – Ethernet Class Reference
    Type Func. Descriptions
    Ethernet () Initialise the ethernet interface.
    virtual ~Ethernet () Powers the hardware down.
    int write (const char *data, int size) Writes into an outgoing ethernet packet.
    int send () Send an outgoing ethernet packet.
    int receive () Recevies an arrived ethernet packet.
    int read (const char *data, int size) Read from an recevied ethernet packet.
    void address (char *mac) RGives the ethernet address of the mbed.
    int link() Returns if an ethernet link is pressent or not.
    void set_link(Mode mode) Sets the speed and duplex parameters of an ethernet link.
  • mbed – EthernetInterface Class Reference

    Type Func. Descriptions
    static int init () Initialize the interface with DHCP.
    static int init (const char *ip, const char *mask, const char *gateway) Initialize the interface with a static IP address.
    static int connect (unsigned int timeout_ms=15000) Connect Bring the interface up, start DHCP if needed.
    static int disconnect () Disconnect Bring the interface down.
    static char* getMACAddress () Get the MAC address of your Ethernet interface.
    static char* getIPAddress () Get the IP address of your Ethernet interface.
    static char* getGateway () Get the Gateway address of your Ethernet interface.
    static char* getNetworkMask () Get the Network mask of your Ethernet interface.
  • Socket – TCPSocketServer Class Reference

    Type Func. Descriptions
    TCPSocketServer () Instantiate a TCP Server.
    int bind (int port) Bind a socket to a specific port.
    int listen (int backlog=1) Start listening for incoming connections.
    int accept ( TCPSocketConnection &connection) Accept a new connection.
    void set_blocking (bool blocking, unsigned int timeout=1500) Set blocking or non-blocking mode of the socket and a timeout on blocking socket operations.
    int set_option (int level, int optname, const void *optval, socklen_t optlen) Set socket options.
    int get_option (int level, int optname, void *optval, socklen_t *optlen) Get socket options.
    int close (bool shutdown=true) Get socket options.
  • Socket – TCPSocketConnection Class Reference

    Type Func. Descriptions
    TCPSocketConnection () TCP socket connection.
    int connect (const char *host, const int port) Connects this TCP socket to the server.
    bool is_connected (void) Check if the socket is connected.
    int send (char *data, int length) Send data to the remote host.
    int send_all (char *data, int length) Send all the data to the remote host.
    int receive (char *data, int length) Receive data from the remote host.
    int receive_all (char *data, int length) Receive all the data from the remote host.
    void set_blocking (bool blocking, unsigned int timeout=1500) Set blocking or non-blocking mode of the socket and a timeout on blocking socket operations.
    int set_option (int level, int optname, const void *optval, socklen_t optlen) Set socket options.
    int get_option (int level, int optname, void *optval, socklen_t *optlen) Get socket options.
    int close (bool shutdown=true) Close the socket.
    void reset_address (void) Reset the address of this endpoint.
    int set_address (const char *host, const int port) Set the address of this endpoint.
    char* get_address (void) Get the IP address of this endpoint.
    int get_port (void) Get the port of this endpoint.

TCP Server Example

The TCP Server example shows how to get started with the Socket API & Ethernet.

  • EthernetInterface includes lwip as software TCP/IP stck
  • EthernetInterface is expected to build the “mbed-rtos”
    TCPserver

  • lwip is a small TCP/IP protocol

  • Protocols: IP, ICMP, UDP, TCP, IGMP, ARP, PPPoS, PPPoE
  • DHCP client, DNS client, AutoIP/APIPA (Zeroconf), SNMP agent (private MIB support)
  • APIs: specialized APIs for enhanced performance, optional Berkeley-alike socket API
    lwIP
include "mbed.h"
#include "EthernetInterface.h"

EthernetInterface eth;

int main()
{
printf("Trying rn");

// as your env. change to real IP address and so on.
int ret = eth.init("192.168.77.34", "255.255.255.0", "192.168.77.1");

if (!ret) {
printf("Initialized, MAC: %snr", eth.getMACAddress());
printf("Connected, IP: %s, MASK: %s, GW: %snr",
eth.getIPAddress(), eth.getNetworkMask(), eth.getGateway());
} else {
printf("Error eth.init() - ret = %dnr", ret);
return -1;
}

eth.connect();
printf("IP Address is %sn", eth.getIPAddress());

TCPSocketServer server;
server.bind(5000);
server.listen();

while (true) {
printf("nWait for new connection...n");
TCPSocketConnection client;
server.accept(client);

client.set_blocking(false, 1500); // Timeout after (1.5)s

printf("Connection from: %sn", client.get_address());

char buffer[2048];
while (true) {
int n = client.receive(buffer, sizeof(buffer));
////int n = client.receive(buffer, 0);
//printf("rcv data len is : %drn", n);
if (n < 0) break; // !_is_connected
/*
if (n <= 0) break; // !_is_connected or !wait_readable
client.send_all(buffer, n);
if (n <= 0) break;
*/
}
client.close();
}

}

mbed RPC with W5500 Ethernet Shield

This post shows how to use mbed RPC with W5500 Ethernet Shield and how to port an Ethernet application used lwIP to W5500Interface.

Remote Procedure Call

In computer science, a remote procedure call (RPC) is an inter-process communication that allows a computer program to cause a subroutine or procedure to execute in another address space (commonly on another computer on a shared network) without the programmer explicitly coding the details for this remote interaction.
http://en.wikipedia.org/wiki/Remote_procedure_call

RPC
*source – http://uw714doc.sco.com/en/SDK_netapi/rpcpD.how_RPC_works.html

HW – FRDM-KL25Z + W5500 Ethernet Shield

FRDM-KL25Z + W5500 Ethernet Shield
http://developer.mbed.org/platforms/KL25Z/
http://developer.mbed.org/components/W5500-Ethernet-Kit-for-IoT/
HW connection : D10 – SCS / D11 – MOSI / D12 – MISO / D13 – SCLK

SW – mbed RPC

Server that executes remote procedure call (RPC) commands through HTTP.
mbed RPC @developer.mbed.org/handbook
In RPC libaray, a simple HTTP Server can execute RPC commands sent from HTTP Client.
This library uses EthernetInterface (lwIP) and mbedOS.

RPC command

The RPC command is encoded in this way :

  • container that wraps a skeleton’s ID
  • method that will be invoked
  • parameters that will be inputted (optional)
    • Command examples
      PUT command : “/DigitalOut/new?arg=LED2&name=led2”
      GET command : “/led2/write?arg=1”

Request handlers

To process requests, the server relies on RequestHandler. Each RequestHandler is assigned to a request type. Each type of request is assigned to a certain role :

  • PUT requests to create new objects
  • DELETE requests to delete objects
  • GET requests to call a function of an object

Porting EthernetInterface to W5500Interface

Here is a guide how to modify :

  • Folk HTTP-Server in you program workspace
  • Delete 2 Folders; EthernetInterface(lwIP) & mbed-rtos in HTTP-Server
  • Added array for MAC Address which was written at Source Hardware Address Register in W5500.
    uint8_t mac_addr[6] = {0x00, 0x08, 0xDC, 0x00, 0x01, 0x02};`
    
  • Change EthernetInterface() and set SPI Interface for W5500
        /*  Use EthernetInterface
         *EthernetInterface eth;
         *if(eth.init())
         *int ret = eth.init("192.168.77.34", "255.255.255.0", "192.168.77.1");    
         */
        /* ----- Use W5500 Ethernet Shied -----*/
        SPI spi(D11, D12, D13);      /* mosi, miso, sclk */
        //spi.frequency(12500000); /* Optional : set proper SPI clock */
        EthernetInterface eth(&spi, D10, D9); /* spi, cs, reset(dummy) */
        ...
        /* ----- Use W5500 Ethernet Shied -----*/
    
  • Set Network configuration: I will use fixed Address.
        /*  in case of using W5500 Ethenret Shield */
        int ret = eth.init(mac_addr, "192.168.77.34", "255.255.255.0", "192.168.77.1");    
        /* in case of using W550io (has a unique real MAC address) */
        //int ret = eth.init("192.168.77.34", "255.255.255.0", "192.168.77.1");   
    

Repository : Users » embeddist » Code » HTTP-Server_W5500Interface

http://developer.mbed.org/users/embeddist/code/HTTP-Server_W5500Interface/

Demo – Using a browser for HTTP Client

Here is a quick guide how to run this program :

  • Compiles this program and copies it to the mbed
  • Open TeraTerm (install it if you don’t have it), select serial and choose the port named “mbed Serial Port”
  • Reset your mbed
  • The IP address should appear in teraterm. In this example, I will use 192.168.77.34
    Terminal
  • Open your browser and go to http://192.168.77.34
    connecttingl
  • If everything is ok, you should see a webpage.

  • Create Red LED as arg=LED1 and name=RLED
    RGB LED
    Create Red LED

  • To procedure, send command: RLED/write 0
    Reset Red LED

  • To procedure, send command: RLED/write 1
    Reset Red LED

SDFileSystem for mbed platfrom

This post shows how to use SDfile System on W5500 Ethernet Shield for mbed platfrom.

SDFile System

A library to allow SD Cards to be accessed as a filesystem, using a SPI interface

SDFileSystem @developer.mbed.org/handbook

This library supports:
– Fat12/ FAT16 / FAT32
– SD / SDHC cards up to 32Gb

HW – W5500 Ethernet Shield with MicroSD Slot

W5500 Ethernet Shield

W5500 Ethernet Shield

  • ARM mbed compatible operation
  • Arduino Pin-compatible
  • Ethernet (W5500 Hardwired TCP/IP chip)
  • MicroSD Slot
  • Ethernet port
  • I2C I/F
  • UART I/F

W5500 Ethernet Shiel Pin Map

W5500 Ethernet Shiel Pin Map

  • SPI Bus support Arduino and mbed platfrom
    MOSI MISO SCK
    D11 D12 D13
    MOSI(ICSP-4) MISO(ICSP-1) SCLK(ICSP-3)
  • SPI_CS and SD_CS pins are allowed to select as below,

    • SPI_CS : D8 / D9 / D10
    • SD_CS : D4 / D5 / D6

SW1 – SDFile System for LPC824 Xpresso (mbed platform)

/**  import SDFiles System Library **/
#include "mbed.h"
#include "SDFileSystem.h"

/*for LPC824 Xpresso */
SDFileSystem sd(D11, D12, D13, D6, "SD"); // the pinout on the mbed Cool Components workshop board
int main() {
    printf("Hello World!n");   
    mkdir("/SD/mydir", 0777);
    FILE *fp = fopen("/SD/mydir/sdtest.txt", "w");
    if(fp == NULL) {
        error("Could not open file for writen");
    }
    fprintf(fp, "Hello fun SD Card World!");
    fclose(fp); 
    printf("Goodbye World!n");
}

SW2 – SDFile System for FRDM-KL25Z (mbed platform)

/**  import SDFiles System Library **/
#include "mbed.h"
#include "SDFileSystem.h"

/*for FRDM-KL25Z */
SDFileSystem sd(D11, D12, D13, D4, "SD"); // the pinout on the mbed Cool Components workshop board
int main() {
    printf("Hello World!n");   
    mkdir("/SD/mydir", 0777);
    FILE *fp = fopen("/SD/mydir/sdtest.txt", "w");
    if(fp == NULL) {
        error("Could not open file for writen");
    }
    fprintf(fp, "Hello fun SD Card World!");
    fclose(fp); 
    printf("Goodbye World!n");
}

Demo.

Notice: SD card name shoud be same variable in sd(mosi, miso, clk, “SDname”).
* Serial terminal
minicom
* Check SD card by using card reader
read SD card
* Confirm stdtest.txt
read SD card

xWifi Open Source Hardware Wi-Fi Module and Dock for the Internet of Things (Crowdfunding)

xWifi Open Source Hardware Wi-Fi Module and Dock for the Internet of Things (Crowdfunding).

xWiFi

xWifi module only specifications:
SoC – Mediatek MT7681 802.11 b/g/n SoC with 32-bit RISC CPU. Support for Client/softAP mode. Package size 5×5 mm
Storage – 512KB SPI Flash (for firmware)
I/Os via headers:
UART and SPI interfaces.
5x GPIOs
PWM
Power – 3.3V, GND
Power Consumption – ~70mA @ 5V (during RX active)
Dimensions – 14 x 17 mm

Hauntbox

Haundbox

What is Hauntbox

The HAUNTBOX is a open source platform which is configured by web browser for haund and some projects.

“It is a system of parts. Sensors and outputs plug into your Hauntbox and it plugs into your network. You tell it what do by using your browser on your computer, iPad or smartphone on your home network with our simple visual interface.”

The Hauntbox supports up to 6 intput and outputs and set what voltate they run and their trigger time.
It controls inputs and outputs with no programming, because of configuring them by the web-based.
setting page
Please, refer to this web-page for more details.

Hardware

Haundbox’ Specs include:
* 256 KB of flash
* 8 KB SRAM (~4.8 KB free with firmware)
* 4 KB EEPROM
* 7-12V input voltage
* 5/12/24V output options depending on power supply
* Supplies up to 300mA per output (open collector)
* W5100 Ethernet controller (works seamlessly with official Arduino libraries)microSD card slot
* FTDI header pins for firmware hacking/updating
* Easy to use screw terminals accepting up to 18 gauge wire
* Unused header pins for easy expansion via Arduino shields or proto-boards
* LEDs indicating I/O status
* Motion sensor (additional/optional)
* Audio module (additional/optional)

Software

Github : https://github.com/Aylr/theHB

##Related Links
Hounbox had funded on Kickstarter and posted on Atmelcoporation.
– Kickstarter : Easily add sound & automation to your HAUNTS and PROJECTS with this open source prop controller without programming! Arduino compatible
– Atmelcorporation : Automate your props with the ATmega2560 based Hauntbox

souliss

souliss

Distributed Framework for Home Automation and Internet of Things

What’s Souliss?

It’s an open source framework which runs over multiple platfoms crossing different the phy layer, as like WiFi, Wireless, and ethernet.

Souliss can not only control and monitor your networked objects, but also share datas and have the trigger-based action from the shared data.

Platform for Souliss

  • Supports Hardware Platform
    • Arduino Boards
    • KMTronic DINo
    • Olimex AVR / OLIMEXINO boards
    • AirQ Network Boards
  • Tranceiver
    • AT86RF230
    • Nordic nRF24L01 and RF24L01+
    • WIZnet W5100 / W5200/ W5500
    • Micodhip ENC28J60

Souliss’s Materials

https://code.google.com/p/souliss/

LeoFi is a Wi-Fi-enabled, Leonardo-compatible board | Bits & Pieces from the Embedded Design World

LeoFi

LeoFi is a Wi-Fi-enabled, Leonardo-compatible board | Bits & Pieces from the Embedded Design World.

Developed by the Sweet Pea team, LeoFi is an Arduino-compatible board with an integrated Wi-Fi module.

LeoFi board is built an ATmega32u4MCU and the CC3300 module with the onboard WiFi chip.
TI CC3300 module is an wireless network processor which supports IEEE 802.11 b/g and Embedded IPv4 TCP/IP stack.

Related Link:
SweetPea Wiki
SweetPea Github
TI CC3300 datasheet


VoCore: A coin-sized Linux computer with wifi | Indiegogo

VoCore: A coin-sized Linux computer with wifi | Indiegogo.VoCore: A coin-sized Linux computer with wifi | Indiegogo

What can You DO with VoCore?

1. Wireless a USB device such as printer, scanner,  hard disk, camera and etc.

2. A remote control robot with camera.

3. A portable VPN router.

4. A wireless speaker.

5. A offline downloader.

6. WIFI -> TTL(or Serial Port) to control Arduino remotely.

http://olimex.wordpress.com/2014/10/24/rt5350f-olinuxino-update/