WIZ Ethernet Library for Arduino IDE-1.6.4

ARM mbed
Download Arduino IDE-1.6.4

WIZ Ethernet Library

The Ethernet library lets you connect to the Internet or a local network.

  • Supported devices
    W5500 : ioShield, WIZ550io, W5500 Ethernet Shield, Arduino Ethernet Shield 2
    W5200 : W5200 Ethernet Shield, WIZ820io
    W5100 : Arduino Ethernet Shield

  • Software

  • Install WIZ Ethernet library IDE-1.6.4
  • Download all files
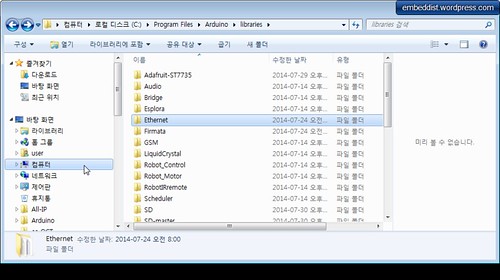
  • Overwrite “Ethernet” folder onto the “Arduino\libraries\Ethernet” folder in Arduino sketch.

  • Select device(shield)

  • Uncomment device(shiel) you want to use in $/Ethernet/src/utility/w5100.h
//#define W5100_ETHERNET_SHIELD // Arduino Ethenret Shield and Compatibles ...
//#define W5200_ETHERNET_SHIELD // WIZ820io, W5200 Ethernet Shield
#define W5500_ETHERNET_SHIELD // WIZ550io, ioShield series of WIZnet
  • If WIZ550io used, uncommnet “#define WIZ550io_WITH_MACAADDRESS” in $/Ethernet/src/utility/w5100.h
#if defined(W5500_ETHERNET_SHIELD)
//#define WIZ550io_WITH_MACADDRESS // Use assigned MAC address of WIZ550io
#include "w5500.h"
#endif
  • Using the WIZ Ethernet library and evaluate existing Ethernet example.
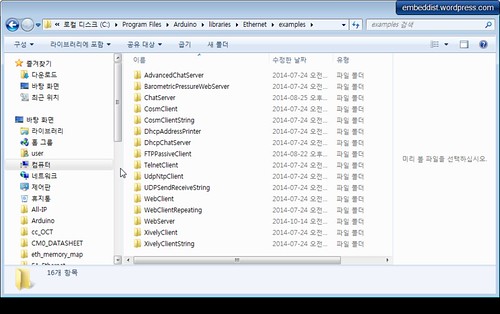
    All other steps are the same as the steps from the Arduino Ethernet Shield. You can use examples in ./Ethernet/examples folder for the Arduino IDE 1.6.4, go to Files->Examples->Ethernet, open any example, then copy it to your sketch file and change configuration values properly.
    After that, you can check if it is work well. For example, if you choose ‘WebServer’, you should change IP Address first and compile and download it. Then you can access web server page through your web browser of your PC or something.

What is new ?

  • Added new functions
  • sockStatus(SOCKET s) = readSnSR(SOCKET s)
uint8_t socketStatus(SOCKET s)
{
SPI.beginTransaction(SPI_ETHERNET_SETTINGS);
uint8_t status = W5100.readSnSR(s);
SPI.endTransaction();
return status;
}
  • reavAvalable(SOCKET s) = getRxReceiveSize(SOCKET s)
int16_t recvAvailable(SOCKET s)
{
SPI.beginTransaction(SPI_ETHERNET_SETTINGS);
int16_t ret = W5100.getRXReceivedSize(s);
SPI.endTransaction();
return ret;
}
  • Added SPI Transaction APIs
    To solve conflicts that sometimes occur between multiple SPI devices when using SPI from interrupts and/or different SPI settings, SPI Transcation APIs use between between read and write SPI functions.
SPI.beginTransaction(SPI_ETHERNET_SETTINGS);
W5100.setIPAddress(_dhcp->getLocalIp().raw_address());
W5100.setGatewayIp(_dhcp->getGatewayIp().raw_address());
W5100.setSubnetMask(_dhcp->getSubnetMask().raw_address());
SPI.endTransaction();
  • Removed Twitter.cpp / Twitter.h

Code on Github

Version History

  • Initial Release : 21 May. 2015

Tip4 – Arduino Example

ArduinoNote List-page

Arduino IDE는 기본적으로 User들을 위해 많은 Example를 포함하고 있다.
이러한 Example즉 각 Skectch의 설명은 아래의 목록은 참고하면 유용하다.
(Ethernet Shiedl관련 sketch의 설명도 있다.)

arduino.cc > Learning > Examples
Language Reference

Ethernet Shield중 ChatServer
하기 그림과 같이 모든Sketch들이
* sketch에 대한 설명
* Hardware Required : 지원하는 platform과 Shield
* Circuit : 회로에 대한 설명
* Schematic
* Code
* See Also : 관련 Sketch 링크
등의 Tutorial식으로 설명한다.
Examples

Tip2 – Arduino COM Port확인하기

ArduinoNote List-page

Sketch IDE 1.5.x 버젼을 설치하면 USB-to-Serial Driver가 함께 설치된다.
Sketch IDE설치 이후 Arduino Board와 PC를 USB cable로 연결하면 USB-to-Serial Driver가 Arduino를 Serial Port인식하게된다.

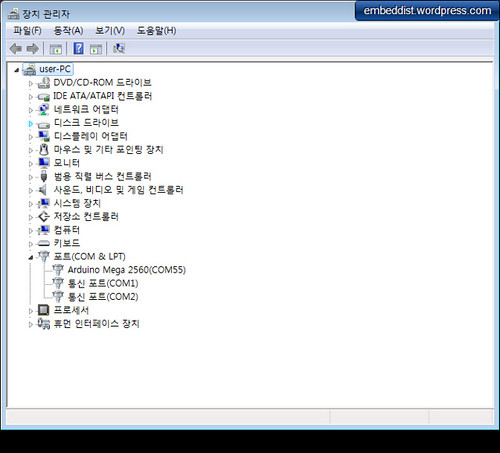
OS가 Windows일 경우 아래와 같이 장치관리자의 COM port부분에 Arduino MEGA 2560(COM55)처럼 인식되는 것을 확인 할 수 있다.
Arduino COM port

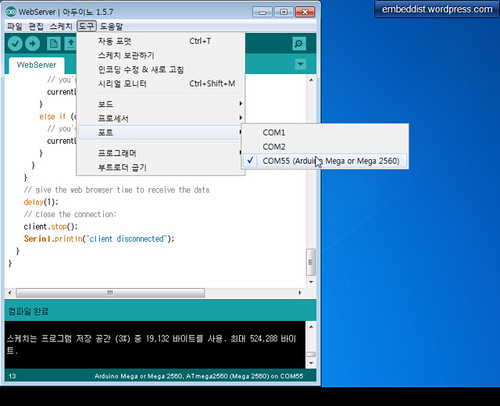
위와 같이 정상적으로 설치되었다면 Sketch IDE에서 Port를 아래와 같이 설정할 수 있다.
port setting on Sketch IDE

Tip1 – MAC / IP / DNS server address, Subnet mask, Default gateway

ArduinoNote List-page

MAC address

Madia Access Control address (MAC address)는 Physical network의 통신을 위해 TCP/IP Network interface에 할당되는 unique idedtifier다.

MAC address는 6개의 2자리 hexadecimal digit으로 구성되며, 보통 colon ‘:’으로 구분된다.
e.g. 01-23-45-67-89-AB or 01:23:45:67:89:AB

MAC Address)

IP address

  • IP address는 Network 상에서 Host를 구별할 수 있는(uniquely identify) 32bit의 수이다.
  • 32bit을 수를 통상적으로 dotted-decimal format으로 표현한다.

    32bit format : 11000000101010000000000100000100
    Dotted-32bit format : 11000000.10101000.00000001.00000100
    Dotted-decimal format: 192.168.1.4

Subnet mask

  • Subnet mask는 Local network(자신이 속한 network)인지 Remote network인지를 판단 할 때 쓰인다.

  • 만약, Subnet mask가 255.255.255.0이라고 가정할 경우

    11111111.11111111.11111111.00000000: Subnet mask (255.255.255.0)

  • 이때, IP address는 192.168.1.4라고 하면

    11000000.10101000.00000001.00000100 : IP address (192.168.1.4)
    11111111.11111111.11111111.00000000 : Subnet mask (255.255.255.0)

  • subnet이 앞에서부터 24Bit만 ‘1’이있으므로 이값을 IP address에 mask씌우면 그값이 바로 Network ID가 된다.

    11000000.10101000.00000001.00000100 : Network address (192.168.1.0)

  • subnet의 뒤부분의 8Bit의 나머지부분에 대응되는 IP address가 바로 Host address가 된다.

    00000000.00000000.00000000.00000100 : Host address (0.0.0.4)

  • 따라서, 어떤 packet이 192.168.1.4의 IP address를 갖고, subnet이 192.168.1.0일 경우에만 Host는 그 Packet를 자신의 packet으로 수신하여 처리할 수 있다.

  • Subnet mask에는 룰이 있는데 32bit중 왼쪽에는 ‘1’채우고 오른쪽은 ‘0’으로 채워야만한다.

    255.255.255.128 11111111.11111111.11111111.10000000
    255.255.255.192 11111111.11111111.11111111.11000000
    255.255.255.224 11111111.11111111.11111111.11100000
    255.255.255.240 11111111.11111111.11111111.11110000

subnet mask
* http://www.itgeared.com/articles/1054-how-ip-packets-are-routed-on-local-area/

Default gateway

다른 Network의 Host와 통신하는 경우 Router라고 하는 장비를 거쳐 통신을 하게 되는데 이 장비를 Default gateway라고 한다. 다시말해, 다른 Network와 Host’s의 subnet를 Link해주는 장비이다. 따라서 Host가 다른 Network에 있는 특정Host에세 packet을 전송할 경우 Default gateway주소를 사용하여 전송할 수 있다.

DNS server address

Domain Name System (DNS)는 TCP/IP Network에서 사용하는 IPaddress와 http://www.host.com과 Domain을 maping 시키는 Name service를 가르키며, DNS address는 Name service Server를 말한다.
아래는 Domain name이 DNS server를 통해 IP address로 변경되는 과정을 보여준다.

www.host.com (Domain name)
8.8.8.8 (DNS server address)

192.168.123.123 (www.host.com의 IP address)

Port number

동일한 IP address상에서 application/process/service를 구별하기 위한 16bit number이다.
port number list @ iana.org
port number

Note9 – WebServer controlled LED Sketch

ArduinoNote List-page
PREVIOUS: Note8 – WebServer controlled LED Demo

Web Server controlled LED Sketch

/*
  Web Server 

 A simple web server that shows the value of the analog input pins.
 using an Arduino Wiznet Ethernet shield. 

 Circuit:
 * Ethernet shield attached to pins 10, 11, 12, 13
 * Analog inputs attached to pins A0 through A5 (optional)

 created 18 Dec 2009
 by David A. Mellis
 modified 9 Apr 2012
 by Tom Igoe
 modified 15 Nov 2014
 by Soohwan Kim 
*/

#include <SPI.h>
#include <Ethernet.h>

// Enter a MAC address and IP address for your controller below.
// The IP address will be dependent on your local network:
#if defined(WIZ550io_WITH_MACADDRESS) // Use assigned MAC address of WIZ550io
;
#else
byte mac[] = {0xDE, 0xAD, 0xBE, 0xEF, 0xFE, 0xED};
#endif

//#define __USE_DHCP__

IPAddress ip(192,168,1,20);
IPAddress gateway( 192, 168, 1, 1 );
IPAddress subnet( 255, 255, 255, 0 );
// fill in your Domain Name Server address here:
IPAddress myDns(8, 8, 8, 8); // google puble dns

// Initialize the Ethernet server library
// with the IP address and port you want to use 
// (port 80 is default for HTTP):
EthernetServer server(80);
void check_led_status();
// Define the LED PORT NUMBER
#define LED_PORT 53

void setup() {
 // Open serial communications and wait for port to open:
  Serial.begin(9600);
   while (!Serial) {
    ; // wait for serial port to connect. Needed for Leonardo only
  }

  // initialize the LED PORT 
  pinMode(LED_PORT, OUTPUT);
  // initaial value is HIGH
  digitalWrite(LED_PORT, HIGH);

  // initialize the ethernet device
#if defined __USE_DHCP__
#if defined(WIZ550io_WITH_MACADDRESS) // Use assigned MAC address of WIZ550io
  Ethernet.begin();
#else
  Ethernet.begin(mac);
#endif  
#else
#if defined(WIZ550io_WITH_MACADDRESS) // Use assigned MAC address of WIZ550io
  Ethernet.begin(ip, myDns, gateway, subnet);
#else
  Ethernet.begin(mac, ip, myDns, gateway, subnet);
#endif  
#endif 

  // start the Ethernet connection and the server:
  server.begin();
  Serial.println("WebServerControlLED");
  Serial.print("server is at ");
  Serial.println(Ethernet.localIP());
}


void loop() {
  // listen for incoming clients
  EthernetClient client = server.available();
  if (client) {
    Serial.println("new client");
    // an http request ends with a blank line
    boolean currentLineIsBlank = true;
    String buffer = ""; // Declare the buffer variable 
    while (client.connected()) {
      if (client.available()) {
        char c = client.read();
        buffer += c;    // Assign to the buffer
        Serial.write(c);
        // if you've gotten to the end of the line (received a newline
        // character) and the line is blank, the http request has ended,
        // so you can send a reply
        if (c == 'n' && currentLineIsBlank) {
          // send a standard http response header
          client.println("HTTP/1.1 200 OK");
          client.println("Content-Type: text/html");
          client.println();
          //client.println("<!DOCTYPE HTML>");
          client.println("<html>");
          client.println("<body>");

          // check the LED status
          if (digitalRead(LED_PORT)>0){
             client.println("LED is <font color='green'>ON</font>");
          }else{
             client.println("LED is <font color='red'>OFF</font>");
          }

          // generate the Form 
          client.println("<br />");
          client.println("<FORM method="get" action="/led.cgi">");
          client.println("<P> <INPUT type="radio" name="status" value="1">ON");
          client.println("<P> <INPUT type="radio" name="status" value="0">OFF");
          client.println("<P> <INPUT type="submit" value="Submit"> </FORM>");

          client.println("</body>");
          client.println("</html>");
          break;
        }
        if (c == 'n') {
          // you're starting a new line
          currentLineIsBlank = true;
          buffer="";
        } 
        else if ( c == 'r') {
            //do cgi parser for LED-On
            if(buffer.indexOf("GET /led.cgi?status=1")>=0){
                // cgi action : LED-On
                digitalWrite(LED_PORT, HIGH);
                // send web-page
                client.println("HTTP/1.1 200 OK");
                client.println("Content-Type: text/html");
                client.println();
                client.println("<html>");
                client.println("<body>");
                // check the LED status
                if (digitalRead(LED_PORT)>0){
                  client.println("LED is <font color='green'>ON</font>");
                }else{
                  client.println("LED is <font color='red'>OFF</font>");
                }
                client.println("<br />");
                client.println("<a href="/led.htm">Go to control-page</a>");

                client.println("</body>");
                client.println("</html>");
                currentLineIsBlank = false;
                break;
            }

            //do cgi parser for LED-Off
            if(buffer.indexOf("GET /led.cgi?status=0")>=0){
                // action : LED-Off
                digitalWrite(LED_PORT ,LOW);
                // send web-page
                client.println("HTTP/1.1 200 OK");
                client.println("Content-Type: text/html");
                client.println();
                client.println("<html>");
                client.println("<body>");
                // check the LED status
                if (digitalRead(LED_PORT)>0){
                  client.println("LED is <font color='green'>ON</font>");
                }else{
                  client.println("LED is <font color='red'>OFF</font>");
                }
                client.println("<br />");
                client.println("<a href="/led.htm">Go to control-page</a>");

                client.println("</body>");
                client.println("</html>");
                currentLineIsBlank = false;
                break;
            }
        }
        else{ //if( c != 'r') {
          // you've gotten a character on the current line
          currentLineIsBlank = false;
        }
      }
    }
    // give the web browser time to receive the data
    delay(1);
    // close the connection:
    client.stop();
    Serial.println("client disonnected");
  }
}

Note8 – WebServer controlled LED DEMO.

ArduinoNote List-page
PREVIOUS: Note7 – WebServer controlled LED

Web Server controlled LED Demo

Web Client(Web-browser)를 이용하여 아래와 같이 Web Server(Arduino)에 접속하여 LED Monitoring과 Remote-Control를 해보자

  • Web-browser의 주소란에 Arduino Board의 IP address와 “/index.htm”입력
    192.168.77.177/index.htm (IP address는 Sketch에서 설정한 값을 이용함)
    
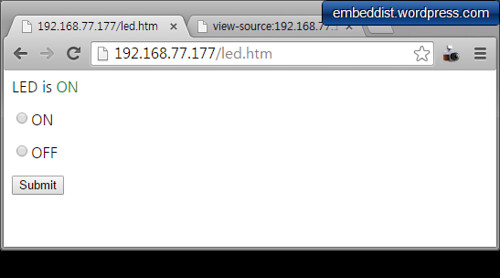
    • index.htm page : LED Status와 Form을 확인 할 수 있다.
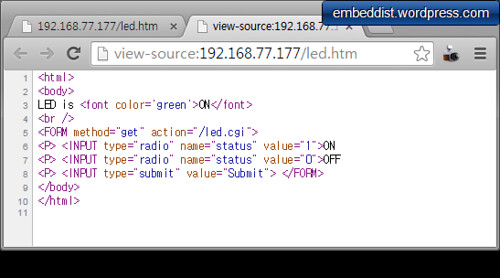
    • index.htm의 Source(HTML)보기: Web-server에서 Generate된 HTML를 확인 할 수 있다.
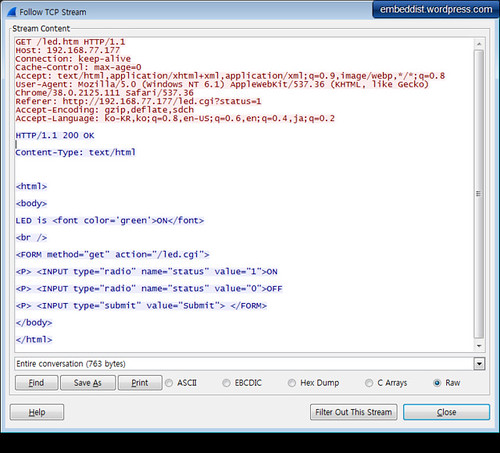
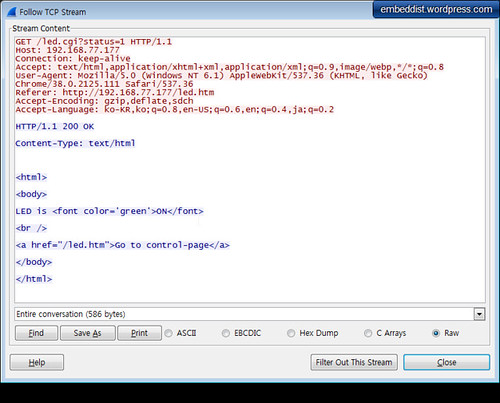
    • index.htm:WireShark를 이용한 Web-server와 Web Client간의 Message교환
      빨간색 : Web-Client가 GET을 이용하여 Web-page를 요청
      파란색 : Web-Server가 “HTTP/1.1 200 OK~”와 Web-page를 Respones함
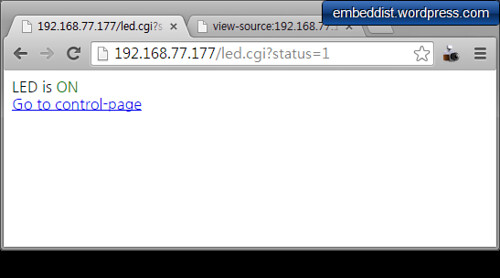
    • LED ON submit Web-page: LED Status와 “led.cgi/status=1″를 확인 할 수 있다.
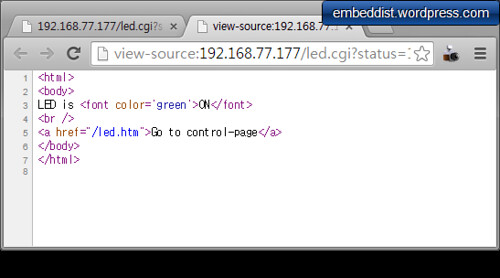
    • LED ON submit Web-page: Source보기
    • LED ON submit Web-page: WireShark를 이용한 Web-server와 Web Client간의 Message교환
      빨간색 : Web-Client가 GET을 “/led.cgi?status=1″를 이용하여 LED ON을 요청
      파란색 : Web-Server가 “HTTP/1.1 200 OK~”와 LED Status를 Respones함

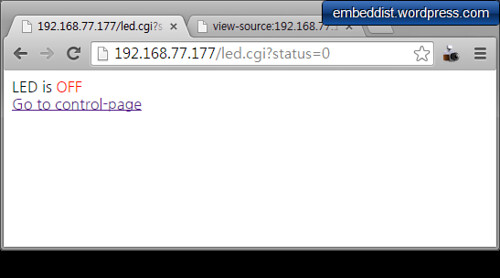
    • LED OFF submit Web-page: LED Status와 “led.cgi/status=1″를 확인 할 수 있다.

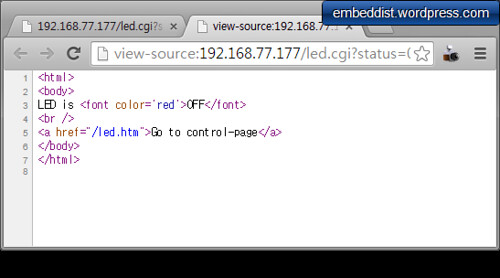
    • LED OFF submit Web-page: Source보기
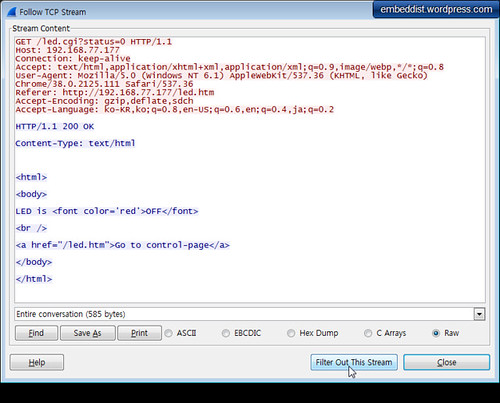
    • LED OFF submit Web-page:WireShark를 이용한 Web-server와 Web Client간의 Message교환
      빨간색 : Web-Client가 GET을 “/led.cgi?status=0″를 이용하여 LED OFF을 요청
      파란색 : Web-Server가 “HTTP/1.1 200 OK~”와 LED Status를 Respones함
  • Link:Wireshark

    “Wireshark is a network protocol analyzer for Unix and Windows”
    쉽게 말해 Packet Capture Program!

NEXT : Note9 – WebServer controlled LED Sketch

Note7 – WebServer controlled LED

ArduinoNote List-page
PREVIOUS: Note6 – WebServer

Hand-on #4: WebServer controlled LED

-Ethernet Shield를 이용한 Remote Control(LED On/Off)과 Monitoring(LED Status)을 함께 해보자

Common Gateway Interface

WWW 서버와 서버 상에서 등장하는 다른 프로그램이나 스크립트와의 인터페이스. 폼을 사용한 메일의 송신이나 게임 등, HTML에서는 불가능한 인터랙티브(interactive)한 요소를 홈페이지에 받아들여 쓸 수 있다.
[네이버 지식백과] CGI [common gateway interface] (컴퓨터인터넷IT용어대사전, 2011.1.20, 일진사)

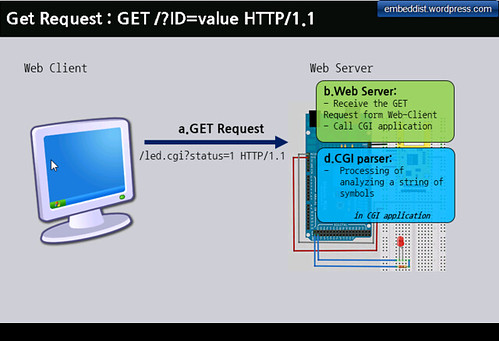
  • Get Request / Receive Req. / CGI parser
    Get Request:cgi

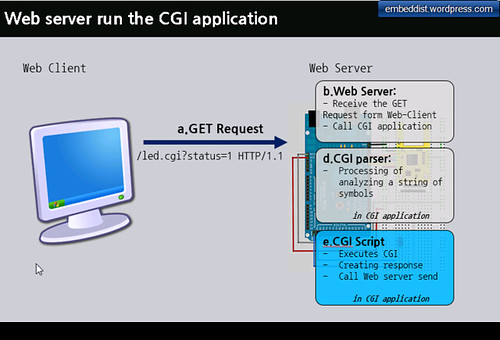
  • Run the CGI App: run CGI scripts
    Run the CGI App.

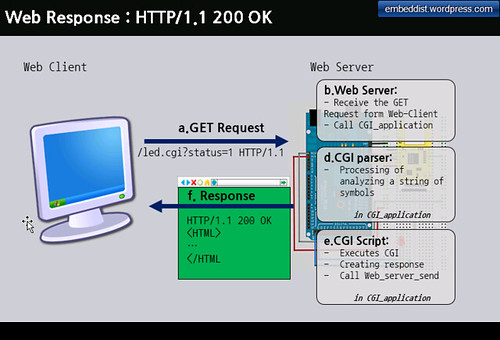
  • Response: call web_server_send from CGI app. and back to Response
    Web Response

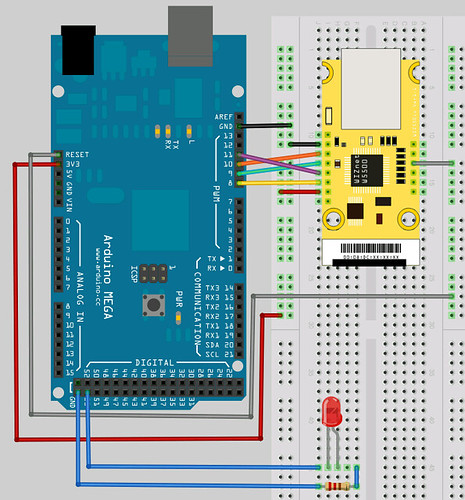
Hardware

Arduino / WIZ550io / LED
* LED를 적절한 포트에 연결한다. 이때, LED에 과전류를 방지하기 위해 저항을 달아준다.

Install Ethenret Library

Network Configuration

Network Configuration

  • Network Configuration on PC side
    Network Configuration
    위와 같이 “Internet Protocol Properies”에서 Network구성을 Test를 위해 아래와 같이 설정해보자
    IP address : 192.168.1.2
    Subnet mask : 255.255.255.0

Default gateway : 192.168.1.1

WebServerControlLED Skeleton

  • Fixed IP address
//#define __USE_DHCP__

IPAddress ip(192,168,1,20);
IPAddress gateway( 192, 168, 1, 1 );
IPAddress subnet( 255, 255, 255, 0 );
// fill in your Domain Name Server address here:
IPAddress myDns(8, 8, 8, 8); // google puble dns
}
  • Port Setting
// Initialize the Ethernet server library
// with the IP address and port you want to use
// (port 80 is default for HTTP):
EthernetServer server(80);
  • setup()
// Define the LED PORT NUMBER
// ...insert codes...  #define LED_PORT XX

void setup() {
 // Open serial communications and wait for port to open:
  Serial.begin(9600);
   while (!Serial) {
    ; // wait for serial port to connect. Needed for Leonardo only
  }


  // initialize the LED PORT 
  // ...insert codes ...
  // initaial value is HIGH
  // ...insert codes ...


  // initialize the ethernet device
#if defined __USE_DHCP__
#if defined(WIZ550io_WITH_MACADDRESS) // Use assigned MAC address of WIZ550io
  Ethernet.begin();
#else
  Ethernet.begin(mac);
#endif  
#else
#if defined(WIZ550io_WITH_MACADDRESS) // Use assigned MAC address of WIZ550io
  Ethernet.begin(ip, myDns, gateway, subnet);
#else
  Ethernet.begin(mac, ip, myDns, gateway, subnet);
#endif  
#endif 

  // start the Ethernet connection and the server:
  server.begin();
  // ...insert codes ...  Welcome messages
  Serial.print("server is at ");
  // ...insert codes ...  print localIP
}

  • loop()
void loop() {
  // listen for incoming clients
  EthernetClient client = server.available();
  if (client) {
    Serial.println("new client");
    // an http request ends with a blank line
    boolean currentLineIsBlank = true;
    String buffer = ""; // Declare the buffer variable 
    while (client.connected()) {
      if (client.available()) {
        char c = client.read();
        buffer += c;    // Assign to the buffer
        Serial.write(c);
        // if you've gotten to the end of the line (received a newline
        // character) and the line is blank, the http request has ended,
        // so you can send a reply
        if (c == 'n' && currentLineIsBlank) {
          // send a standard http response header
          client.println("HTTP/1.1 200 OK");
          client.println("Content-Type: text/html");
          client.println();
          //client.println("<!DOCTYPE HTML>");
          client.println("<html>");
          client.println("<body>");

          // check the LED status
          // ...insert codes ...

          // generate the Form 
          // ...insert codes ...

          client.println("</body>")
          client.println("</html>");
          break;
        }
        if (c == 'n') {
          // you're starting a new line
          currentLineIsBlank = true;
          buffer="";
        } 
        else if ( c == 'r') {
            //do cgi parser for LED-On
            //if(...insert codes ...
                //  action : LED-On
                //digitalWrite(...insert codes ...
                // send web-page
                client.println("HTTP/1.1 200 OK");
                client.println("Content-Type: text/html");
                client.println();
                client.println("<html>");
                client.println("<body>");
                // check the LED status
                // ...insert codes ...
                client.println("<br />");
                client.println("<a href="/led.htm">Go to control-page</a>");

                client.println("</body>");
                client.println("</html>");
                currentLineIsBlank = false;
                break;
            }

            //do cgi parser for LED-Off
            //if(...insert codes ...
                //  action : LED-Off
                //digitalWrite(...insert codes ...
                // send web-page
                client.println("HTTP/1.1 200 OK");
                client.println("Content-Type: text/html");
                client.println();
                client.println("<html>");
                client.println("<body>");
                // check the LED status
                // ...insert codes ...
                client.println("<br />");
                client.println("<a href="/led.htm">Go to control-page</a>");

                client.println("</body>");
                client.println("</html>");
                currentLineIsBlank = false;
                break;
            }
        }
        else{ //if( c != 'r') {
          // you've gotten a character on the current line
          currentLineIsBlank = false;
        }
      }
    }
    // give the web browser time to receive the data
    delay(1);
    // close the connection:
    client.stop();
    Serial.println("client disonnected");
  }
}

NEXT : Note8 – WebServer controlled LED Demo

Note6 – WebServer

ArduinoNote List-page
PREVIOUS: Note5 – isShield-A

Hand-on #3: WebServer

-Ethernet Shield를 이용한 Remote monitoring을 해보자

Web-Server?

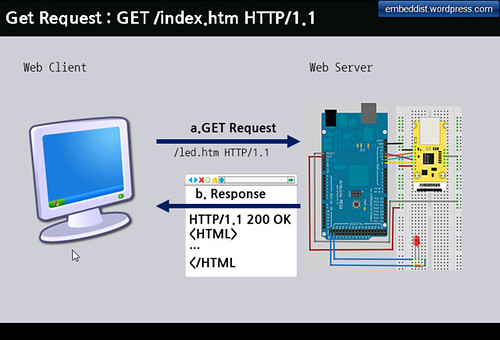
Web-Server는 Web-site를 hosting하고 있는 서버로 간단하게 아래의 그림과 같이 Web brower와 같은 Client가 Web-server에 저장되어 있는 Web-page에 대한 Request 요청했을 경우 해당 Wep-page를 Client에세 Reponse하는 Server는 말한다. 이때 Web-server와 Client는 Hypertext Transfer Protocol (HTTP)통해서 hypertext를 Trasfer/Exchange한다.

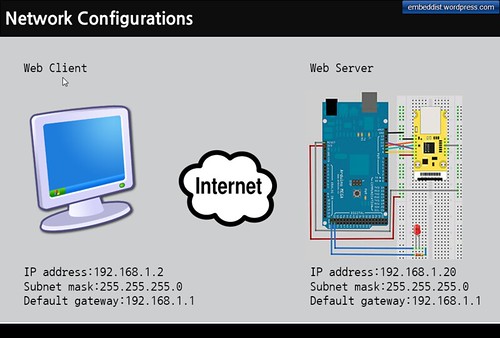
Network Configuration

Get Request:index.htm

Install Ethenret Library

Network Configuration on PC side

Network Configuration

위와 같이 “Internet Protocol Properies”에서 Network구성을 Test를 위해 아래와 같이 설정해보자

    IP address : 192.168.1.2
    Subnet mask : 255.255.255.0
    Default gateway : 192.168.1.1

Web Server Sketch

  • Fixed IP address
IPAddress ip(192, 168, 1, 20);
IPAddress gateway(192, 168, 1, 1);
IPAddress subnet(255, 255, 255, 0);
// fill in your Domain Name Server address here:
IPAddress myDns(8, 8, 8, 8); // google puble dns
void setup() {
 ...
#if defined(WIZ550io_WITH_MACADDRESS) // Use assigned MAC address of WIZ550io
  Ethernet.begin(ip, myDns, gateway, subnet);
#else
  Ethernet.begin(mac, ip, myDns, gateway, subnet);
#endif  
...
}
  • Port Setting
// Initialize the Ethernet server library
// with the IP address and port you want to use
// (port 80 is default for HTTP):
EthernetServer server(80);
  • setup()
void setup() 
{
    // Open serial communications and wait for port to open:
    Serial.begin(9600);
    while (!Serial) 
    {
        ; // wait for serial port to connect. Needed for Leonardo only
    }

    // start the Ethernet connection and the server:
    #if defined(WIZ550io_WITH_MACADDRESS) // Use assigned MAC address of WIZ550io
       Ethernet.begin(ip, myDns, gateway, subnet);
    #else
       Ethernet.begin(mac, ip, myDns, gateway, subnet);
    #endif
    server.begin();
    Serial.print("server is at ");
    Serial.println(Ethernet.localIP());
}

  • loop()
void loop() {
  // listen for incoming clients
  EthernetClient client = server.available();
  if (client) {
    Serial.println("new client");
    // an http request ends with a blank line
    boolean currentLineIsBlank = true;
    while (client.connected()) {
      if (client.available()) {
        char c = client.read();
        Serial.write(c);
        // if you've gotten to the end of the line (received a newline
        // character) and the line is blank, the http request has ended,
        // so you can send a reply
        if (c == 'n' && currentLineIsBlank) {
          // send a standard http response header
          client.println("HTTP/1.1 200 OK");
          client.println("Content-Type: text/html");
          client.println("Connection: close"); // the connection will be closed after completion of the response
          client.println("Refresh: 5");  // refresh the page automatically every 5 sec
          client.println();
          client.println("<!DOCTYPE HTML>");
          client.println("<html>");
          // output the value of each analog input pin
          for (int analogChannel = 0; analogChannel < 6; analogChannel++) {
            int sensorReading = analogRead(analogChannel);
            client.print("analog input ");
            client.print(analogChannel);
            client.print(" is ");
            client.print(sensorReading);
            client.println("<br />");
          }
          client.println("</html>");
          break;
        }
        if (c == 'n') {
          // you're starting a new line
          currentLineIsBlank = true;
        }
        else if (c != 'r') {
          // you've gotten a character on the current line
          currentLineIsBlank = false;
        }
      }
    }
    // give the web browser time to receive the data
    delay(1);
    // close the connection:
    client.stop();
    Serial.println("client disconnected");
  }

Compile

  • IDE 메뉴의 스케치>확인/컴파일
    Verify

Program

  • IDE 메뉴의 파일>프로그램어를통해업로드
    Upload

Web-Client (Web-browser)를 이용하여 Web-server (Arduino Board)에 접속

  • web-browser을 실행하고 주소창에 아래와 같이 입력한다.
    http://"Arduino board IP address":"port number
    http://192.168.1.20:80
    
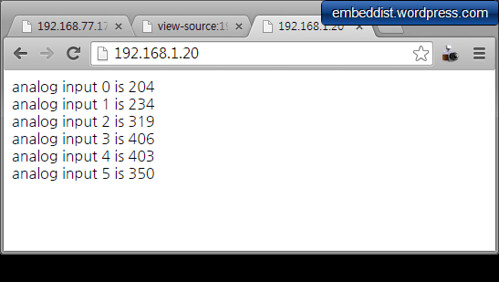
  • Web-browser실행 화면
    실제로 port에서 입력된 값을 Web-page를 통해 보여줌으로써 Remote Monitoring이 가능함을 보여준다. 5개의 값들은 ADC입력 값을 출력한다. 현재 ADC에 입력이 없기 때문에 Dummy값이 출력되는 것을 볼수 있다.
    Web-browser
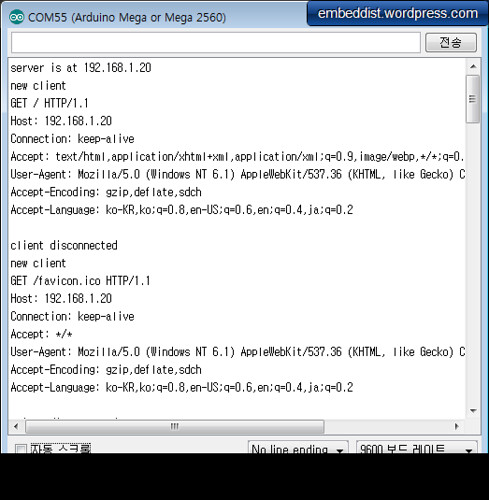
    Serial Monitor를 통해 Log값을 볼수 있다. Welcome message와 Web-Client로 부터 수신한 내용을 확인 할 수 있다.
    Serial Monitor

NEXT : Note7 – WebServer controlled LED

Note5 – ioShield-A

ArduinoNote List-page
PREVIOUS: Note4 – Ethernet shield

ioShield-A

ioSheild-A

ioShield-A는 Arduino Platform을 Internet에 연결하게 해주는 Ethernet Shield의 하나이다. Ethernet Shield는 TCP/IPCore Chip으로 W5100의 기반으로 하였으나, ioShield는 W5500을 적용하였다. W5500은 동시에 W5100보다 많은 소켓 수(8Socket)지원 할 수 있으며, Fast SPI (upto 80MHz)를 지원한다. 특별히, 이 Ethenret Shield는 WIZ550io와 Installing Board로 구성되어 있으며, WIZ550io에서 embedded된 MAC Address를 지원하기 때문에 별도의 MAC Address구매없이 Real MAC Address를 사용할 수 있다.

ioShield-A
* WIZ550io: wizwiki
* Schematic: ioshield-a_v1.1_sch.pdf
* Ethernet Library: WIZ_Ethernet_Library
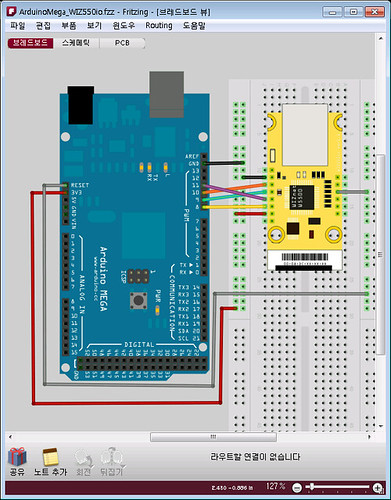
* SPI port: ICSP Header사용
* Github: frizing project for WIZ550io

WIZ Ethernet Library Install

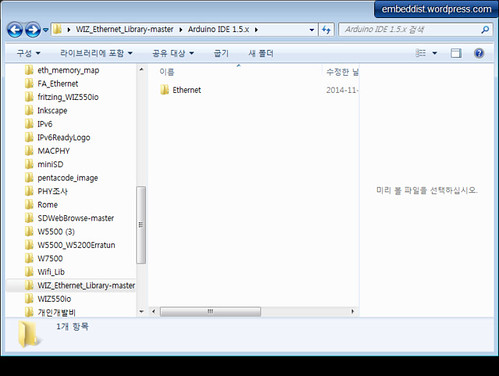
  • Download Library: WIZ_Ethernet_Library-master.zip

  • 압축해제 한뒤 Ethernet폴더를 Copy한다.
    Ethernet폴더

  • 기존의 Sketch IDE를 설치하고 생긴 C:/Program Files/Arduino/Ethernet폴더와 Replace한다.
    Ethernet폴더 replace

  • Ethernet Library에 /Arduino/Ethernet/examples 아래와 같이 다양한 example들이 포함되어 있다.
    Ethernet Library

NEXT : Note6 – WebServer

Note4 – Ethernet shield

ArduinoNote List-page
PREVIOUS: Note3 – Hello world

Ethernet Shield

Ethernet Shield

Arduino Ethernet Shield는 Arduino Platform들을 Internet에 연결할 수 있는 Arduino Platform에 Plug-in하는 Module이다. Ethernet Shield에는 TCP/UDP Network stack을 처리할 수 있는 Ethernet Chip인 W5100 (WIZnet)가 onboard되어 있다. 이 칩과 제공되는 Ethernet Library를 통해 Arduino Platform이 Internet에 연결될수 있도록 합니다. 또한 이 Shield에서 RJ45 (Ethernet) Port를 통해 Ethernet Cable를 연결할 수 있으며, Micro-SD Slot을 지원하여 Network를 통한 File을 저장할 수 있도록 지원한다.

Serial Peripheral Interface

Arduino의 MCU와 Ethernet Shield의 W5100의 Connection을 위해 Serial Peripheral Interface(SPI)를 사용한다. SPI는 Synchronous Serial data protocol를 사용하며 Duplex를 지원하는 Bus Interface이다. 아래와 깉이 MISO, MOSI, SCK, SS 4개의 Line으로 구성돤다.

  • SPI Signals
    • MISO (Master In Slave Out) – The Slave line for sending data to the master
    • MOSI (Master Out Slave In) – The Master line for sending data to the peripherals
    • SCK (Serial Clock) – The clock pulses which synchronize data transmission generated by the master
    • SS (Slave Select) – the pin on each device that the master can use to enable and disable specific devices.
  • Connections
    아래 표와 같이 Arduino Board마다 SPI port가 각각 다르며 ICSP에는 SPI Interface가 공통으로 존재합니다.

    Arduino Board MOSI MISO SCK
    Uno or Duemilanove 11 or ICSP-4 12 or ICSP-1 13 or ICSP-3
    Mega1280 or Mega2560 51 or ICSP-4 50 or ICSP-1 52 or ICSP-3
    Leonardo ICSP-4 ICSP-1 ICSP-3
    Due ICSP-4 ICSP-1 ICSP-3
    • ICSP Header
      ICSP Header
  • Ethernet shield compatible (W5100 base)
    • Seeedstudio
      Seeedstudio
    • DFROBOT
      DFROBOT
    • e-gizmo
      e-gizmo

NEXT : Note5 – isShield-A