ArduinoNote List-page
PREVIOUS: Note6 – WebServer
Hand-on #4: WebServer controlled LED
-Ethernet Shield를 이용한 Remote Control(LED On/Off)과 Monitoring(LED Status)을 함께 해보자
Common Gateway Interface
WWW 서버와 서버 상에서 등장하는 다른 프로그램이나 스크립트와의 인터페이스. 폼을 사용한 메일의 송신이나 게임 등, HTML에서는 불가능한 인터랙티브(interactive)한 요소를 홈페이지에 받아들여 쓸 수 있다.
[네이버 지식백과] CGI [common gateway interface] (컴퓨터인터넷IT용어대사전, 2011.1.20, 일진사)
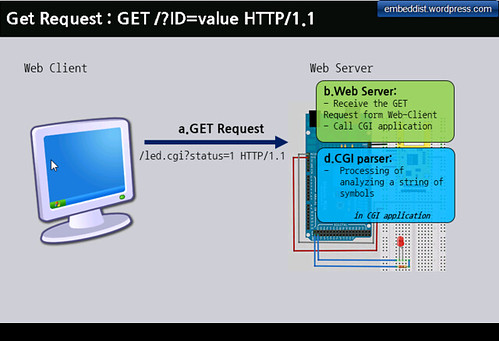
- Get Request / Receive Req. / CGI parser
-
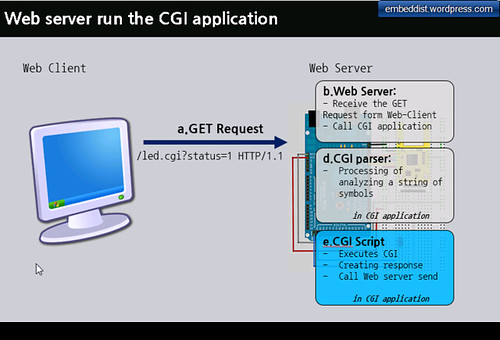
Run the CGI App: run CGI scripts
-
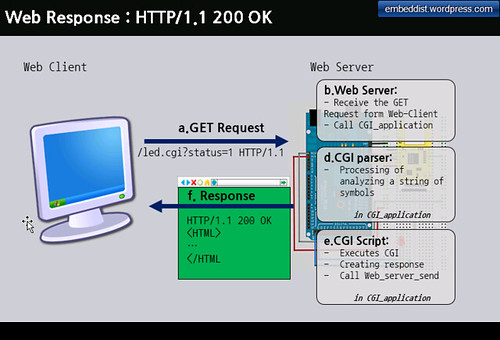
Response: call web_server_send from CGI app. and back to Response
Hardware

* LED를 적절한 포트에 연결한다. 이때, LED에 과전류를 방지하기 위해 저항을 달아준다.
Install Ethenret Library
- Download : WIZ Ethernet Library for IDE 1.5.x
- Add Ethernet Library : Copy to *”../libraries/” *
Network Configuration
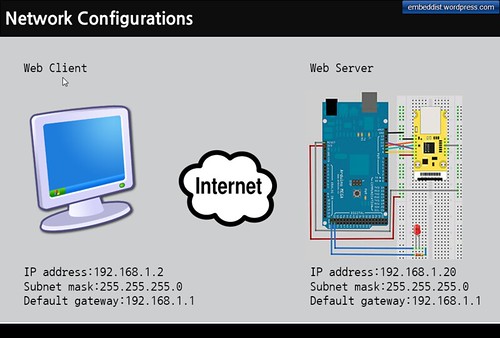
- Network Configuration on PC side

위와 같이 “Internet Protocol Properies”에서 Network구성을 Test를 위해 아래와 같이 설정해보자
IP address : 192.168.1.2
Subnet mask : 255.255.255.0
Default gateway : 192.168.1.1
WebServerControlLED Skeleton
- Fixed IP address
//#define __USE_DHCP__

IPAddress ip(192,168,1,20);
IPAddress gateway( 192, 168, 1, 1 );
IPAddress subnet( 255, 255, 255, 0 );
// fill in your Domain Name Server address here:
IPAddress myDns(8, 8, 8, 8); // google puble dns
}
- Port Setting
// Initialize the Ethernet server library
// with the IP address and port you want to use
// (port 80 is default for HTTP):
EthernetServer server(80);
- setup()
// Define the LED PORT NUMBER
// ...insert codes...  #define LED_PORT XX

void setup() {
 // Open serial communications and wait for port to open:
  Serial.begin(9600);
   while (!Serial) {
    ; // wait for serial port to connect. Needed for Leonardo only
  }


  // initialize the LED PORT
  // ...insert codes ...
  // initaial value is HIGH
  // ...insert codes ...


  // initialize the ethernet device
#if defined __USE_DHCP__
#if defined(WIZ550io_WITH_MACADDRESS) // Use assigned MAC address of WIZ550io
  Ethernet.begin();
#else
  Ethernet.begin(mac);
#endif
#else
#if defined(WIZ550io_WITH_MACADDRESS) // Use assigned MAC address of WIZ550io
  Ethernet.begin(ip, myDns, gateway, subnet);
#else
  Ethernet.begin(mac, ip, myDns, gateway, subnet);
#endif
#endif

  // start the Ethernet connection and the server:
  server.begin();
  // ...insert codes ...  Welcome messages
  Serial.print("server is at ");
  // ...insert codes ...  print localIP
}
- loop()
void loop() {
  // listen for incoming clients
  EthernetClient client = server.available();
  if (client) {
    Serial.println("new client");
    // an http request ends with a blank line
    boolean currentLineIsBlank = true;
    String buffer = ""; // Declare the buffer variable
    while (client.connected()) {
      if (client.available()) {
        char c = client.read();
        buffer += c;    // Assign to the buffer
        Serial.write(c);
        // if you've gotten to the end of the line (received a newline
        // character) and the line is blank, the http request has ended,
        // so you can send a reply
        if (c == 'n' && currentLineIsBlank) {
          // send a standard http response header
          client.println("HTTP/1.1 200 OK");
          client.println("Content-Type: text/html");
          client.println();
          //client.println("<!DOCTYPE HTML>");
          client.println("<html>");
          client.println("<body>");

          // check the LED status
          // ...insert codes ...

          // generate the Form
          // ...insert codes ...

          client.println("</body>")
          client.println("</html>");
          break;
        }
        if (c == 'n') {
          // you're starting a new line
          currentLineIsBlank = true;
          buffer="";
        }
        else if ( c == 'r') {
            //do cgi parser for LED-On
            //if(...insert codes ...
                //  action : LED-On
                //digitalWrite(...insert codes ...
                // send web-page
                client.println("HTTP/1.1 200 OK");
                client.println("Content-Type: text/html");
                client.println();
                client.println("<html>");
                client.println("<body>");
                // check the LED status
                // ...insert codes ...
                client.println("<br />");
                client.println("<a href="/led.htm">Go to control-page</a>");

                client.println("</body>");
                client.println("</html>");
                currentLineIsBlank = false;
                break;
            }

            //do cgi parser for LED-Off
            //if(...insert codes ...
                //  action : LED-Off
                //digitalWrite(...insert codes ...
                // send web-page
                client.println("HTTP/1.1 200 OK");
                client.println("Content-Type: text/html");
                client.println();
                client.println("<html>");
                client.println("<body>");
                // check the LED status
                // ...insert codes ...
                client.println("<br />");
                client.println("<a href="/led.htm">Go to control-page</a>");

                client.println("</body>");
                client.println("</html>");
                currentLineIsBlank = false;
                break;
            }
        }
        else{ //if( c != 'r') {
          // you've gotten a character on the current line
          currentLineIsBlank = false;
        }
      }
    }
    // give the web browser time to receive the data
    delay(1);
    // close the connection:
    client.stop();
    Serial.println("client disonnected");
  }
}

Pingback: Arduino를 IoT 기기로 만들어 보기 – Webserver 따라하기 | B Story ..