ArduinoNote List-page
PREVIOUS: Note5 – isShield-A
Hand-on #3: WebServer
-Ethernet Shield를 이용한 Remote monitoring을 해보자
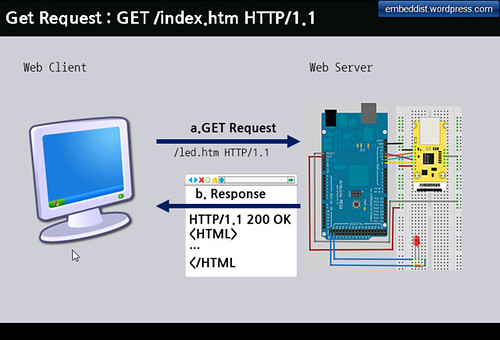
Web-Server?
Web-Server는 Web-site를 hosting하고 있는 서버로 간단하게 아래의 그림과 같이 Web brower와 같은 Client가 Web-server에 저장되어 있는 Web-page에 대한 Request 요청했을 경우 해당 Wep-page를 Client에세 Reponse하는 Server는 말한다. 이때 Web-server와 Client는 Hypertext Transfer Protocol (HTTP)통해서 hypertext를 Trasfer/Exchange한다.
Install Ethenret Library
- Download : WIZ Ethernet Library for IDE 1.5.x
- Add Ethernet Library : Copy to *”../libraries/” *
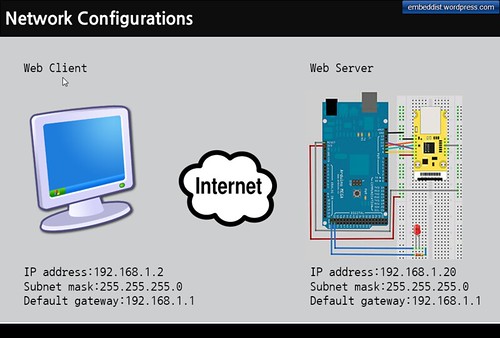
Network Configuration on PC side

위와 같이 “Internet Protocol Properies”에서 Network구성을 Test를 위해 아래와 같이 설정해보자
    IP address : 192.168.1.2
    Subnet mask : 255.255.255.0
    Default gateway : 192.168.1.1
Web Server Sketch
- Fixed IP address
IPAddress ip(192, 168, 1, 20);
IPAddress gateway(192, 168, 1, 1);
IPAddress subnet(255, 255, 255, 0);
// fill in your Domain Name Server address here:
IPAddress myDns(8, 8, 8, 8); // google puble dns
void setup() {
 ...
#if defined(WIZ550io_WITH_MACADDRESS) // Use assigned MAC address of WIZ550io
  Ethernet.begin(ip, myDns, gateway, subnet);
#else
  Ethernet.begin(mac, ip, myDns, gateway, subnet);
#endif
...
}
- Port Setting
// Initialize the Ethernet server library
// with the IP address and port you want to use
// (port 80 is default for HTTP):
EthernetServer server(80);
- setup()
void setup()
{
    // Open serial communications and wait for port to open:
    Serial.begin(9600);
    while (!Serial)
    {
        ; // wait for serial port to connect. Needed for Leonardo only
    }

    // start the Ethernet connection and the server:
    #if defined(WIZ550io_WITH_MACADDRESS) // Use assigned MAC address of WIZ550io
       Ethernet.begin(ip, myDns, gateway, subnet);
    #else
       Ethernet.begin(mac, ip, myDns, gateway, subnet);
    #endif
    server.begin();
    Serial.print("server is at ");
    Serial.println(Ethernet.localIP());
}
- loop()
void loop() {
  // listen for incoming clients
  EthernetClient client = server.available();
  if (client) {
    Serial.println("new client");
    // an http request ends with a blank line
    boolean currentLineIsBlank = true;
    while (client.connected()) {
      if (client.available()) {
        char c = client.read();
        Serial.write(c);
        // if you've gotten to the end of the line (received a newline
        // character) and the line is blank, the http request has ended,
        // so you can send a reply
        if (c == 'n' && currentLineIsBlank) {
          // send a standard http response header
          client.println("HTTP/1.1 200 OK");
          client.println("Content-Type: text/html");
          client.println("Connection: close"); // the connection will be closed after completion of the response
          client.println("Refresh: 5");  // refresh the page automatically every 5 sec
          client.println();
          client.println("<!DOCTYPE HTML>");
          client.println("<html>");
          // output the value of each analog input pin
          for (int analogChannel = 0; analogChannel < 6; analogChannel++) {
            int sensorReading = analogRead(analogChannel);
            client.print("analog input ");
            client.print(analogChannel);
            client.print(" is ");
            client.print(sensorReading);
            client.println("<br />");
          }
          client.println("</html>");
          break;
        }
        if (c == 'n') {
          // you're starting a new line
          currentLineIsBlank = true;
        }
        else if (c != 'r') {
          // you've gotten a character on the current line
          currentLineIsBlank = false;
        }
      }
    }
    // give the web browser time to receive the data
    delay(1);
    // close the connection:
    client.stop();
    Serial.println("client disconnected");
  }
Compile
- IDE 메뉴의 스케치>확인/컴파일
Program
- IDE 메뉴의 파일>프로그램어를통해업로드
Web-Client (Web-browser)를 이용하여 Web-server (Arduino Board)에 접속
- web-browser을 실행하고 주소창에 아래와 같이 입력한다.
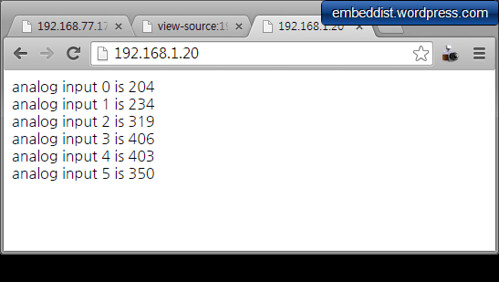
http://"Arduino board IP address":"port number http://192.168.1.20:80 - Web-browser실행 화면
실제로 port에서 입력된 값을 Web-page를 통해 보여줌으로써 Remote Monitoring이 가능함을 보여준다. 5개의 값들은 ADC입력 값을 출력한다. 현재 ADC에 입력이 없기 때문에 Dummy값이 출력되는 것을 볼수 있다.
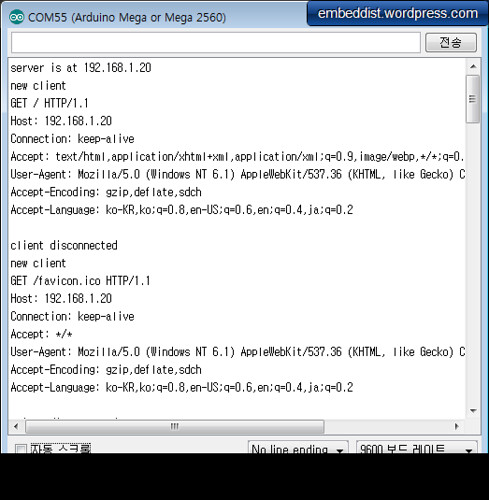
Serial Monitor를 통해 Log값을 볼수 있다. Welcome message와 Web-Client로 부터 수신한 내용을 확인 할 수 있다.

Pingback: Arduino를 IoT 기기로 만들어 보기 – Webserver 따라하기 | B Story ..
Pingback: ioShield-A | Irina's Atelier